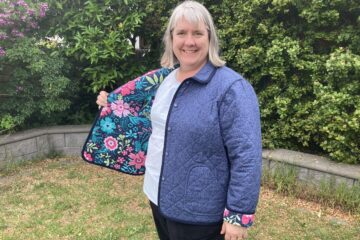
For last year’s Royal Adelaide Show, I entered the dressmaking category “Garment or outfit featuring recycled material.”
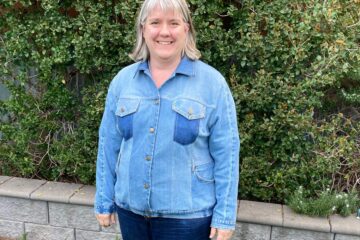
I’d been meaning to make use of the large bag of worn-out jeans for a while, so I decided to turn some into a denim jacket for myself. I previously made a red cotton drill jacket that I wear often, but I’d been wanting a lighter denim version for a while—something that wouldn’t match too closely with the indigo jeans I usually wear.
The original plan was to use two pairs of my husband’s jeans, but I quickly realised I’d need a third. I picked ones in similar light washes to keep the patchwork look more subtle.
Inspiration
I found plenty of inspiration online from others who had made denim jackets from old jeans, and picked up some fantastic ideas along the way. A few even shared helpful tips on cutting and assembling the pieces. You can see what I saved on my Pinterest board.
Jacket Pattern Used

I re-used my Kwik Sew 2895 pattern with all the adjustments I used for my Red Drill Jacket. Namely
- the length of View A
- the waistband of View B (resized to fit)
- the sleeve and cuff of view B
Jeans to be Cut
These are the three pairs of jeans I started with—two Amco and one pair of Riders. You can see the worn areas around the crotch, which is why they were no longer wearable.

Cutting Out the Jacket
I wanted to get the pieces cut out quickly, so instead of unpicking seams, I simply cut them apart. The only exception was the back pockets—I wanted to use those for the chest pocket flaps on the jacket.
I loved the worn impressions left behind on the back of the jeans after removing them.

✂️I have documented below the order in which I did the cutting out✂️
Upper Sleeve
To cut the upper sleeve, I cut open the jeans along the bulky inner seam because if I needed to have a seam in the sleeve I wanted to use the thinner outer seam as it would be more comfortable to wear..

Front Inset
I cut the Front Inset—the centre front panel where the chest pocket flap would sit—using the area where the back pockets had been. I thought the faded outlines would add an interesting detail and subtly echo the look of the flaps.

Front
I carefully cut the front piece so the jeans’ side seam aligned with the jacket’s front fold line, which becomes part of the facing. I liked the subtle fading along that seam—it added character. The cutting was done in two steps: first, I cut the right side of the fold line while it was pinned in place. Then I unfolded the piece, pinned the left side to the jeans, and cut that section out.

Front Yoke
As with the front piece, I wanted to use the jeans’ side seam along the yoke’s fold line to showcase the worn edge. This was another multi-step cutting process: first cutting along the pinned top and bottom edges of the yoke, then trimming around the inner seam.

Finally, the cut-out piece was laid flat and placed onto the back of the jeans, pinned and cut.

The cut-out front yoke.

Back Side Panel
For the back side panel, I wanted to highlight the inner seam with its double row of stitching and the beautiful faded effect of the denim. This would give the jacket a corset-like appearance with its “boning,” but in this case, it would be represented by two lines of topstitching—an effect I planned to use on all the back seams.

I wasn’t able to perfectly align the inner seam lines on both back side panels. Instead, I made sure they avoided areas with multiple intersecting seams, like the top or bottom of the armhole curve.

Back
The back piece was cut along the jeans’ inner seam, placing it at the centre of the pattern piece, to continue the corset effect of the back side pieces. It was trimmed near the hem since I didn’t plan to use the original hem for this jacket.

Back Yoke
A jean seam line on the back yoke was unavoidable, given its large size, so I placed the seam horizontally across the centre so it would run parallel to where the yoke joins the jacket’s back panels. Cutting it out was a two-step process, beginning with the sides and top edge of the pattern piece.

Next, I unfolded the already cut section to complete cutting the bottom of the back yoke.
I really like how it turned out.

Under Sleeve
For the under sleeve, I used the plain outer side seam instead of the bulky inner seam, thinking it would be more comfortable to wear while still incorporating a clean vertical line.

Chest Pocket Lining
I used the lining from the jeans’ front pocket for one side of the chest pocket lining. Since this fabric is quite thin, it helps keep the bulk down. The other side of the pocket lining will be denim, as it will be visible when the pocket is opened.

Collar
By this stage, I was running low on fabric but was keen to incorporate the back pockets and their unique fading. So, I stitched the pockets together along their outer edges, which had a slight diagonal, arranging them alternately right side up and upside down for an interesting pattern.


I really love the look of the back pockets, so I used them for the top collar. For the under collar, I chose a plain design, though I had to sew together smaller sections to create a piece large enough.

Waistband & Cuffs
I always planned to use the jeans’ waistbands for both the jacket’s waistband and cuffs, preserving the topstitching on the folded edges. So, I cut just below the waistbands on all three pairs of jeans since I needed them all.
One waistband wasn’t long enough for the jacket’s bottom, so I had to join two pieces. I didn’t want to sew them directly together because the preserved topstitching would make it bulky. After experimenting with denim scraps to blend the join, it still looked a bit odd. To make it look intentional, I added the leather patch over the join. We’ll see how it turns out!

Side Fronts
I planned to incorporate the front pockets on the side fronts, inspired by an example I found online. However, because of the pockets’ placement on the jeans and their position on the jacket, I had to piece together some denim above the pockets to fit the pattern. I’ll document this process in part 2 of sewing my recycled denim jacket.
See part 2 for Sewing Recycled Denim Jacket to see the final jacket.
0 Comments